A dip tube plays a vital role in your water heater. It directs cold water from the top of the tank to the bottom, ensuring that you have a consistent supply of hot water. Over time, however, the dip tube can wear out, and when it does, it’s important to know how to replace it. In this comprehensive guide, we’ll walk you through the steps required to replace a dip tube in a water heater.
To replace the dip tube in a water heater, first, turn off the power and drain the tank. Locate and remove the old dip tube. Inspect it for any damage. Prepare the replacement dip tube by wrapping it with plumber’s tape. Insert the replacement tube into the tank and replace the pipe connector. Refill the tank and restore power. Finally, check to ensure the new dip tube is functioning properly.
Identifying a Faulty Dip Tube
Before we delve into the replacement process, it’s important to know the signs that indicate a dip tube needs replacement. These include:
- Little white flecks of plastic in your hot water supply
- Decreased water temperature
- Shortage of hot water
- Clogged faucets and appliances
- Hot water running out fast
- Water heaters made between 1993 and 1997 are more prone to dip tube issues
Tools and Materials Needed
To replace a dip tube, you’ll need the following:
- Replacement dip tube (preferably made from polyethylene)
- Plumber’s tape
- Wrench
- Bucket
Replacing the Dip Tube: Step-by-Step Guide
Step 1: Turn Off the Power
Turn off the power to your water heater. If it’s an electric heater, turn off the circuit breaker. If it’s a gas heater, turn off the gas supply.
Step 2: Drain the Tank
Attach a garden hose to the drain valve at the bottom of the tank and place the other end of the hose over a drain. Open the tank’s pressure relief valve to let the pressure escape. Open the drain valve and let the water drain from the tank.
Step 3: Locate and Remove the Dip Tube
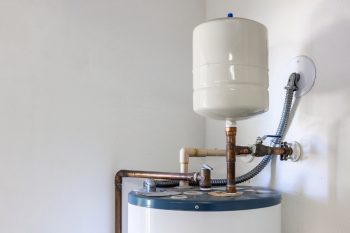
The top of the dip tube sticks up on the top right of the tank and has a pipe nipple and cold water pipe connector. Turn the connector and nipple counterclockwise with a wrench to remove them. After this, you should be able to pull out the old dip tube.
Step 4: Inspect the Old Dip Tube
Look for cracks and small holes. Run water through the dip tube to see if any water leaks through cracks or holes that you can’t see.
Step 5: Prepare the Replacement Dip Tube
Wrap plumber’s tape around the top of the replacement dip tube to seal off any possible drips or leaks in the threads of two parts that screw together.
Step 6: Insert the Replacement Dip Tube
Push the dip tube in all the way until the tip of the tube is flush with the tank. If you’re using a curved tube, it should point away from the drain valve so that it swirls the water inside the tank.
Step 7: Replace the Pipe Connector
Use a pipe wrench to tighten the cold water pipe connector firmly, making sure that it will not come out or fall off.
Step 8: Refill the Tank
Turn on the cold water supply to refill the tank. Leave a hot water faucet open in your home to release any air in the system.
Step 9: Restore Power
Turn on the circuit breaker or gas supply.
Step 10: Check the New Dip Tube
Turn on the hot water in your home to check that the new dip tube is functional.
Conclusion
Replacing a dip tube is a relatively simple process that can greatly improve your water heater’s performance. However, if you’re not comfortable doing these steps yourself, it’s always best to hire a professional. This guide should serve as a comprehensive resource for understanding the process, whether you plan to do it yourself or just want to understand what a professional will do.
Frequently Asked Questions
How often should I replace the dip tube in my water heater?
The lifespan of a dip tube can vary depending on the quality of the water and the material of the tube. However, it is generally recommended to inspect and possibly replace your dip tube every 5 to 7 years.
Can I use any type of dip tube for my water heater?
While most dip tubes are similar, it’s best to purchase a replacement that matches the original one. They can be straight or curved, and the right type depends on your specific water heater model. Always make sure the replacement dip tube is made of a durable material like polyethylene.
What will happen if I don’t replace a faulty dip tube?
If a faulty dip tube is not replaced, it can lead to a number of issues. Your water heater may not heat water efficiently, leading to a decrease in water temperature. You may also find plastic bits in your hot water, or your faucets and appliances may get clogged.
How can I tell if my water heater is gas or electric?
Generally, a gas water heater will have a vent on top to exhaust fumes, while an electric one will not. You can also check for a gas line leading into the unit, or a power cord if it’s electric.
Can I use the hot water immediately after replacing the dip tube?
After replacing the dip tube and refilling the tank, you need to give the water heater some time to heat up the water. The exact time will depend on the capacity and efficiency of your heater.


