In today’s world, energy efficiency is a top priority, and one of the ways homeowners can conserve energy is by using Direct Current (DC) ceiling fans. However, most households operate on Alternating Current (AC) power, which can pose a challenge when installing a DC ceiling fan. This article will provide a comprehensive guide on how to connect a DC ceiling fan to AC power, covering everything you need to know from the tools you’ll need, the step-by-step process, safety precautions, and future considerations.
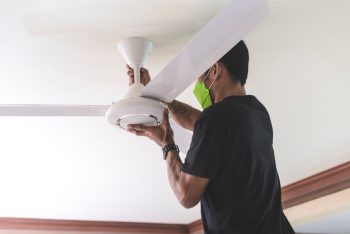
Connecting a DC ceiling fan to AC power involves using a fan with a built-in AC to DC converter. After ensuring the power is turned off, assemble the fan according to the manufacturer’s instructions. Secure the ceiling bracket, attach the downrod, and then wire the fan by connecting the black (hot) wire, the white (neutral) wire, and the ground wire from the ceiling source to the corresponding wires on the fan. Install the fan canopy and any additional components, turn the power back on, and test the fan. Always follow safety procedures and consider hiring a licensed electrician if unsure.
Understanding DC and AC Power
Before diving into the process, it’s essential to understand the key difference between DC and AC power. DC power involves a constant flow of electric charge in one direction with a steady voltage, used in electronic devices like computers and electric vehicles. On the other hand, AC power involves a periodically changing voltage that swings between positive and negative values, causing the electric current’s direction to change. This makes AC power suitable for power transmission and household appliances.
The Benefits and Pitfalls of a DC Ceiling Fan Connected to AC Power
Connecting a DC ceiling fan to AC power allows homeowners to enjoy the benefits of a DC fan’s energy efficiency and quiet operation. DC fans consume up to 70% less power and generally generate more airflow, making them suitable for larger rooms. They also come with advanced features like reverse functionality and different speed settings.
However, this doesn’t come without its pitfalls. DC fans tend to be more expensive due to their energy-efficient features. Additionally, they require a transformer to convert AC power to DC, making the installation process potentially more complicated and costly.
Essential Tools and Materials
To connect a DC ceiling fan to AC power, you’ll need the following tools and materials: 1. Screwdrivers 2. Wire strippers 3. Wire connectors 4. Electrical tape 5. Ladder 6. DC Ceiling fan with a built-in AC to DC converter
Safety Precautions
Before starting the installation process, it’s critical to take several safety precautions: 1. Always turn off the power at the circuit breaker before starting any electrical work. 2. Hire a licensed electrician if you’re not comfortable doing the work yourself. 3. Follow the manufacturer’s instructions closely. 4. Use an all-pole disconnection switch in the fixed wiring. 5. Install an isolation switch for each fan if there are multiple fans.
Step-by-Step Guide to Connecting a DC Ceiling Fan to AC Power
Once you’ve prepared the necessary tools and taken the appropriate safety precautions, you can start the installation process:
- Turn off the power: Always switch off the power at the circuit breaker before starting any electrical work.
- Assemble the fan: Follow the manufacturer’s instructions to assemble the fan, including attaching the blades and any additional components.
- Install the ceiling bracket: Secure the ceiling bracket to the electrical box in the ceiling, ensuring it is properly supported and can handle the weight of the fan.
- Attach the downrod: Connect the downrod to the fan motor, and then attach the downrod ball to the ceiling bracket. Rotate the fan until it locks into place.
- Wire the fan: Some DC ceiling fans have a receiver pre-wired to the motor, making the wiring process simpler. In this case, you only need to connect the black (hot) wire, the white (neutral) wire, and the ground wire from the ceiling source to the corresponding wires on the fan.
- Install the fan canopy: Slide the canopy up the downrod and secure it to the ceiling bracket, covering the wiring connections.
- Attach any additional components: If your fan has a light kit or other accessories, follow the manufacturer’s instructions to install them.
- Turn the power back on: Once the fan is fully installed, turn the power back on at the circuit breaker or fuse box.
- Test the fan: Turn on the fan using the included remote control or wall switch to ensure it is functioning properly.
Troubleshooting and Maintenance
Once your DC ceiling fan is safely connected to AC power, regular maintenance will ensure it continues to operate efficiently. This includes cleaning the fan annually to prevent dust buildup, tightening screws, and checking the motor for dust buildup.
In conclusion, connecting a DC ceiling fan to AC power requires careful planning, the right tools, and following safety procedures. However, the energy efficiency and advanced features of a DC fan make the effort worthwhile. Always remember to consult with a licensed electrician if you’re unsure about any part of the process.
Frequently Asked Questions
What is a transformer and why do I need it for a DC ceiling fan?
A transformer is a device that changes the voltage of an electric current. For a DC fan, you need a transformer to convert the AC power typically supplied in homes to the DC power that the fan can use.
Why are DC ceiling fans more energy efficient than AC fans?
DC ceiling fans are more energy-efficient because they use a different type of motor that consumes less power. Unlike AC motors that require a high initial surge of energy to start, DC motors start up gradually, reducing the energy used.
Can I use the same remote for multiple DC fans?
Yes, you can use the same remote for multiple DC fans, provided they are from the same manufacturer and model. Ensure to follow the manufacturer’s instructions to sync the remote to each fan.
What should I do if my DC fan is not working after installation?
If your DC fan is not working after installation, check if the wiring connections are correct and secure. Also, ensure the circuit breaker or fuse is switched on. If the problem persists, consult with a licensed electrician.
How often should I clean my DC ceiling fan?
It’s advisable to clean your DC ceiling fan at least once a year to prevent dust buildup, which can affect its performance. However, if the fan is in a high-traffic area or used frequently, more frequent cleaning might be necessary.

