The circuit breaker, an essential component of any home’s electrical system, serves as the first line of defense against electrical overloads and short circuits that could lead to fires. In this comprehensive guide, we will explain how to safely connect a circuit breaker, the tools you will need, and other essential tips and precautions to ensure a safe and successful installation.
To safely connect a circuit breaker, first, turn off the power to the entire electrical panel. Next, remove the panel cover and install the new circuit breaker. Connect the hot wire to the new circuit breaker and install it into the panel. Attach the neutral and ground wires to their respective bus bars in the panel. Test the circuit breaker to ensure it’s functioning correctly, then replace the panel cover. Always follow safety precautions and consider seeking professional help if you’re unsure about the process.
What is a Circuit Breaker?
A circuit breaker is an electrical safety device designed to protect an electrical circuit from damage caused by overcurrent or short circuit. Its primary function is to interrupt current flow when a fault is detected. Unlike a fuse, which operates once and then must be replaced, a circuit breaker can be reset (either manually or automatically) to resume normal operation.
Necessary Tools and Materials
To safely connect a circuit breaker, you will need the following tools and materials:
- Flashlight
- Needle-nose pliers
- Utility knife
- Voltage tester
- Wire stripper/cutter
- AFCI circuit breaker
- Cable clamp
- Electrical staples
- Screwdrivers
- Safety goggles
- Rubber-soled safety boots
- Cable connectors
Safety Precautions
Before attempting to connect a circuit breaker, it is essential to follow several safety precautions:
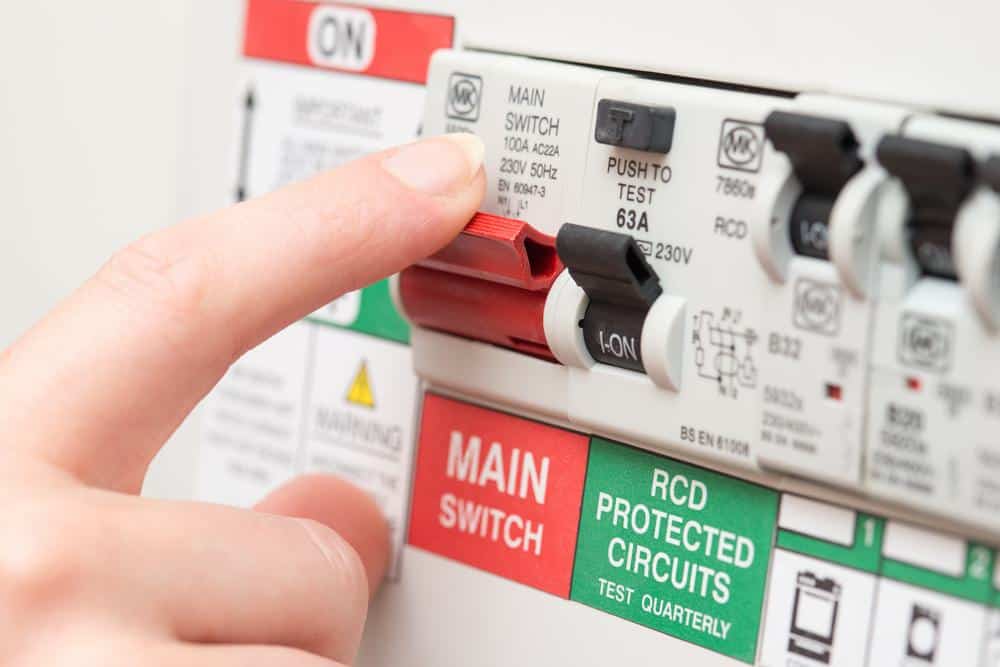
- Turn off all power: Switch off the main breaker to the entire electrical panel to prevent electrical shocks and accidents during the installation process.
- Wear protective gear: Always wear personal protective equipment (PPE) when working with circuit breakers to protect yourself from potential hazards.
- Use the right circuit breaker: Ensure that the device you choose matches the wiring, load requirements, and type of switchgear/switchboard.
- Inspect tools and new parts: Check that all the tools, wires, and new parts are free from damage before starting the installation process.
- Avoid overloading: Do not connect devices that draw more current than the circuit breaker’s rating, as overloading can lead to overheating, tripping of the circuit breaker, or even fire hazards.
- Follow electrical codes: Adhere to the local and national electrical codes to ensure a safe and compliant installation.
Step-by-Step Guide to Connecting a Circuit Breaker
Here is a comprehensive step-by-step guide on how to correctly and safely connect a circuit breaker:
- Turn Off the Power: Before starting any work, turn off the power to the entire electrical panel by switching off the main breaker. This step is essential to prevent electrical shocks and accidents during the installation process.
- Remove the Panel Cover: Unscrew and carefully remove the panel cover to access the circuit breakers.
- Install the New Circuit Breaker: Align the new circuit breaker with the bars in the panel. Attach the hold-on clip on the bottom of the breaker to the plastic “grab” bar in the panel. Once attached, pivot the circuit breaker on the mechanical contact and roll it towards the center of the panel.
- Connect the Wires: Insert the end of the hot wire (usually black or red) into the terminal on the new circuit breaker and tighten the setscrew. In a 120/240-volt circuit, connect the red hot wire to the second circuit breaker terminal.
- Install the Circuit Breaker into the Panel: Place the breaker where your wire will terminate into the notch or slot inside the panel that is away from the bus bars. Then, snap the other end of the breaker onto the bus of the panel.
- Connect the Neutral and Ground Wires: Attach the neutral wire (usually white) to the neutral bus bar and the ground wire (usually green or bare copper) to the ground bus bar in the panel.
- Test the Circuit Breaker: Turn the main breaker back on and test the new circuit breaker to ensure it’s functioning correctly.
- Replace the Panel Cover: Reattach the panel cover and label the new circuit breaker on the breaker panel cover for easy identification in case of an emergency.
Common Mistakes to Avoid
Some common mistakes homeowners make when connecting a circuit breaker include using the wrong size wires, overloading electrical outlets, improper grounding, using the wrong size circuit breakers, and making connections outside electrical boxes. To avoid these mistakes, always use the correct size and type of wires for your circuit breaker, avoid overloading outlets, ensure proper grounding of electrical systems, choose the right size circuit breakers for your electrical needs, and make connections within electrical boxes for safety and protection.
In conclusion, while connecting a circuit breaker can be a do-it-yourself task for some, it involves working with electricity, which can be dangerous. If you encounter difficulties or are unsure about any part of the process, it’s always best to seek the help of a professional electrician.
Frequently Asked Questions
What is an AFCI circuit breaker and why is it needed?
An AFCI (Arc Fault Circuit Interrupter) circuit breaker is a safety device that protects the electrical circuit from arc faults. Arc faults can occur when electricity moves from one conductor across an insulator to another conductor. This situation can cause electrical fires. An AFCI circuit breaker detects such conditions and disconnects the circuit to prevent fire hazards.
How do I know if my circuit breaker is working properly?
To check if your circuit breaker is working properly, you can use a voltage tester. After installing the new circuit breaker and turning the main power back on, place the voltage tester’s probe on the screw where the wire is connected to the breaker. If the tester lights up, it indicates that the breaker is working correctly.
What is a bus bar in an electrical panel?
A bus bar in an electrical panel is a strip or bar of copper, brass or aluminum that conducts electricity within a switchboard, distribution board, substation, battery bank, or other electrical apparatus. In a circuit breaker panel, the hot wires connect to the circuit breakers, which are then connected to the bus bars.
What is the difference between the neutral and ground wire?
The neutral wire, typically white, is a return path for the current in an electrical circuit. It carries the current back to the source. On the other hand, the ground wire, usually green or bare copper, provides an alternate path for electrical current to follow should there be a problem in the wiring system, like a short circuit. The ground wire helps prevent electrical shock.
What happens if I use the wrong size circuit breaker?
Using the wrong size circuit breaker can lead to several issues. If the breaker is too small for the circuit, it may trip frequently, even when the electrical load is within safe levels. If the breaker is too large for the circuit, it may not trip when it should, potentially allowing an unsafe amount of current to flow through the circuit, which could lead to overheating, electrical fires, and other dangers.


