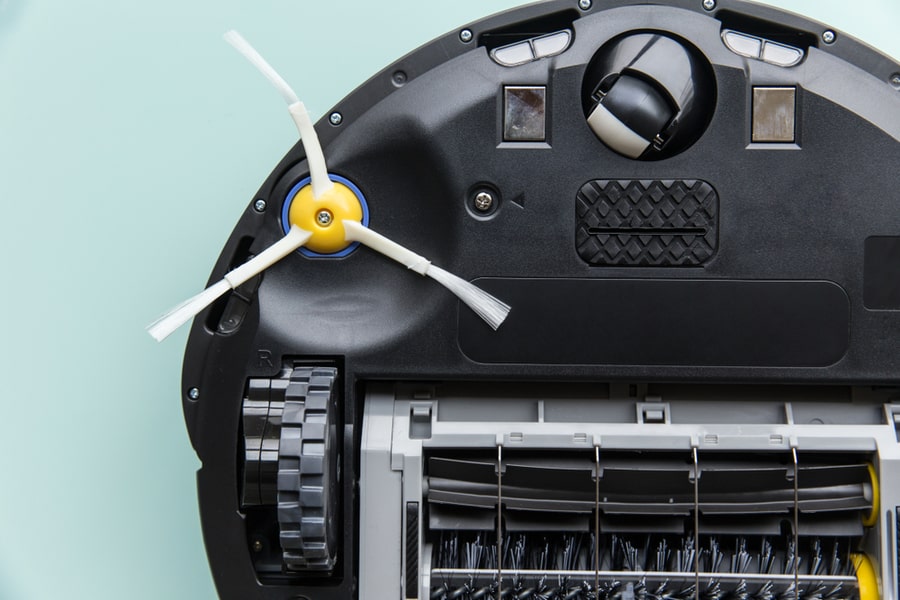
Underneath your Roomba smart vac are a set of side brushes. These long, bristled brushes reach into nooks and crannies to loosen dirt and dust as your vacuum moves along its path.
This way, your Roomba can achieve a more thorough, efficient clean.
Sometimes, you might run into issues with your Roomba’s side brushes. Fortunately, this is one of the easiest things to fix and replace on the Roomba smart vac.
I was wondering how to do it. So here’s a quick guide.
- Roomba side brushes can stop working if they’re dirty or damaged.
- A good cleaning might be all you need to get them to work again if they’re lodged with dirt.
- If they’re damaged, you can replace the side brushes with spare brushes from the manufacturer.
Roomba smart vacuums come equipped with side brushes that turn as your Roomba moves forward. If your brushes have stopped turning, inspecting and replacing them might be time.
Why Does a Roomba’s Side Brush Stop Working?
A Roomba’s side brushes move rapidly as your vacuum starts on its course. So it’s no surprise that the brushes succumb to wear and tear much faster than the rest of your smart vac.
There are two major reasons why a Roomba’s side brush might stop working, and these include the following:
- Blockage – The brushes use stiff, synthetic nylon bristles that extend several inches to remove lodged dirt from hard-to-reach areas on your floors. However, as they spin, they could also accumulate dirt and dust that impedes the free movement of the mechanism.
As a result, the brushes could stall or stop moving completely. - Wear and tear – These side brushes use a mounting mechanism concealed by the vacuum’s back panel. While they’re designed to last up to a year, constant movement can cause wear and tear, degrading the material over time.
As a result, you may have to replace your side brushes to get them working properly. - Damage – Although this rarely happens, it can damage the side brushes. Falls, run-ins with the family pet, and curious kids can damage the brushes and stop them from working. In this case, you may have to replace them entirely.
How To Replace Roomba Side Brushes
If the brushes can be cleaned to restore their function, then that might be all you need to do. But if the side brushes are damaged beyond repair, you must replace them as soon as possible.
Here’s how to do it:
- Remove the side brushes: When you turn over the Roomba, you can remove the side brushes by removing the screw that holds them in place.
- Remove the back plate: With the brushes out of the way, you can unscrew the back plate to reveal the mounts for the side brushes.
- Replace the mounts: If they are defective, you can replace them with spare parts from Roomba.
- Close the vacuum: Return the back plate with the new side brush mounts in place.
- Replace the side brushes: At this point, you can put the new side brushes into place. Screw them securely, and your Roomba is ready to go.
Summary
Roomba’s side brushes are vital to its cleaning performance. If your Roomba’s side brushes are struggling to do their job, you can either clean them or replace them if damaged. These simple steps should help you get the job done with zero fuss.
Frequently Asked Questions
When Should You Replace a Roomba’s Side Brushes?
According to the manufacturer, the side brushes need to be replaced once every six months to one year.
But if the brushes are damaged or inefficient before that time, you can replace them before the recommended time frame.
How Much Are Roomba Side Brushes?
Replacement brushes vary in cost depending on the specific kind that you buy. The prices range from $6.99 to $8.95 but may change if you buy the paired mounts and the brushes.

